Everyday WireGuard
This post outlines how I’ve implemented a secure, fast, and reliable VPN solution for my mobile devices. I spend a good deal of time working outside of an office or my home, often on public or otherwise potentially nefarious networks. By setting up an on demand VPN connection, I can keep my traffic and DNS requests encrypted and out of the hands of potential malicious actors.
Parts needed
- I’m electing to use DigitalOcean for this project. They have a $5/month offering that has more than enough resources for this project, so that’s what I’ll be provisioning. This will allow for an always on, always available system with a static IP address.
- WireGuard is the VPN of choice for this project. There are Linux/Windows/Android/iOS/iPadOS/macOS (you get the picture) clients available, it’s very easy to setup, low overhead, and secure.
- DNS will be handled by two projects: Unbound and Pi-Hole.
- Unbound is a secure validating, recursive, and caching DNS server.
- Pi-Hole uses a modified version of dnsmasq called FTLDNS to create a network-level advertisement and tracker blocking resolver. It’s designed to run on low powered devices, like the Raspberry Pi, so it’s perfect for this application.
Getting started
Deploy a DigitalOcean droplet
This is a very painless process, but if you haven’t done it before you can get a much more thorough explanation here. If you don’t already have an account, sign up (don’t forget to enable 2 factor auth!), put in your payment details and you’re ready to go. Once that’s complete:
- Click the green ‘Create’ button and select ‘Droplets’
- Pick your distribution of choice. I’m going with Debian 10, so the examples and snippets will be focused there.
- Choose a plan, the cheapest one has more than enough resources for this project.
- Pick a datacenter as geographically close to you as you’d prefer.
- Upload or generate an SSH key. You will be logging in remotely as root at least once, so make sure to be secure. Read the docs if you’re unfamiliar with the process, but I’d strongly encourage using SSH keys.
- Finally click the create droplet button and you’ll have a shiny new linux server.
I would recommend not adding/configuring a Cloud Firewall for this project, as we’ll be using native linux tools to secure our droplet.
Server config
For brevity I’m going to stick to configuring the VM for the services listed above. You should absolutely do some basic hardening to the server, such as adding a new non-root user, configuring sudo or doas, and locking down /etc/sshd_config to keep your server secure. Refer to this tutorial for more details and explanations. For the purposes of this post, I’m going to assume you’re running with root permissions.
Once your server is up and running, you’ll see an IP address assigned on the dashboard. Head off to your registrar or wherever your DNS records live and create a new A record pointing at this IP. I’ll be using my test domain for this, so i’m going to call this host vpn.hrkrdr.com. Once that’s replicated out, you can get started configuring your server:
Login to your new host as root (the only user so far) using your secure SSH key, and do the following:
# Enable backports (required to install wireguard), update package information and upgrade the system
 echo 'deb http://ftp.debian.org/debian buster-backports main' | sudo tee /etc/apt/sources.list.d/buster-backports.list
 apt update && apt upgrade -y
<...>
# Reboot system
 reboot
<...>
# SSH back in after a minute or so to continue, then
# Install the uncomplicated firewall system
 apt install ufw
<...>
 ufw allow ssh
 ufw allow 51820/udp

# This might disconnect your session!
 ufw enable

# Install wireguard, unbound, and necessary packages
 apt install -y wireguard unbound dnsutils qrencode
Base packages should now be installed, so let’s configure our services.
Unbound
Unbound will be providing the actual DNS lookups and caching for our system. We’re going to configure it to listen locally on a non-standard port that’s only going to be accessible to the Pi-Hole system.
To get unbound working, we need to create a new file in /etc/unbound/unbound.conf.d/ called pihole-resolver.conf (or whatever you’d like to call it, as long as it ends in .conf). Fire up your favorite editor (nano is probably the easiest) and input the following config:
server:
    # If no logfile is specified, syslog is used
    # logfile: "/var/log/unbound/unbound.log"
    verbosity: 0

    interface: 127.0.0.1
    port: 5335
    do-ip4: yes
    do-udp: yes
    do-tcp: yes

    # May be set to yes if you have IPv6 connectivity
    do-ip6: yes

    # You want to leave this to no unless you have *native* IPv6. With 6to4 and
    # Terredo tunnels your web browser should favor IPv4 for the same reasons
    prefer-ip6: no

    # Use this only when you downloaded the list of primary root servers!
    # If you use the default dns-root-data package, unbound will find it automatically
    #root-hints: "/var/lib/unbound/root.hints"

    # Trust glue only if it is within the server's authority
    harden-glue: yes

    # Require DNSSEC data for trust-anchored zones, if such data is absent, the zone becomes BOGUS
    harden-dnssec-stripped: yes

    # Don't use Capitalization randomization as it known to cause DNSSEC issues sometimes
    # see https://discourse.pi-hole.net/t/unbound-stubby-or-dnscrypt-proxy/9378 for further details
    use-caps-for-id: no

    # Reduce EDNS reassembly buffer size.
    # Suggested by the unbound man page to reduce fragmentation reassembly problems
    edns-buffer-size: 1472

    # Perform prefetching of close to expired message cache entries
    # This only applies to domains that have been frequently queried
    prefetch: yes

    # One thread should be sufficient, can be increased on beefy machines. In reality for most users running on small networks or on a single machine, it should be unnecessary to seek performance enhancement by increasing num-threads above 1.
    num-threads: 1

    # Ensure kernel buffer is large enough to not lose messages in traffic spikes
    so-rcvbuf: 1m

    # Ensure privacy of local IP ranges
    private-address: 192.168.0.0/16
    private-address: 169.254.0.0/16
    private-address: 172.16.0.0/12
    private-address: 10.0.0.0/8
    private-address: fd00::/8
    private-address: fe80::/10
Save the file and then we’re ready to fire up unbound.
systemctl enable unbound --now
<...>
# for some reason it doesn't pick up the new config until you restart the service:
systemctl restart unbound

# Test resolution:
dig @localhost -p 5335 google.com

<...>
;; ANSWER SECTION:
google.com.		300	IN	A	142.251.33.78

;; Query time: 41 msec
;; SERVER: 127.0.0.1#5335(127.0.0.1)
;; WHEN: Thu May 27 16:23:52 PDT 2021
;; MSG SIZE  rcvd: 55
After that very painless procedure, we’ve got a recursive caching DNS resolver.
Pi-Hole
Pi-Hole is a DNS sinkhole that aims to protect all your devices, including locked down or embedded devices like smart TVs, from advertising and malware. It’s really fast, really lightweight, and very configurable. Pi-Hole isn’t in the OS repos, so we’ll need to install it manually using a script provided by the project. I highly recommend donating if you find their excellent work useful!
The Pi-Hole project is well documented, and some of their excellent write-ups made this post possible. I’m not a big fan of piping scripts directly to bash, and I’ve seen enough security demos justifying my paranoia, so we’re going to pull the script down and run it manually:
cd /tmp/
wget -O basic-install.sh https://install.pi-hole.net

# Trust but verify!
less basic-install.sh
bash basic-install.sh
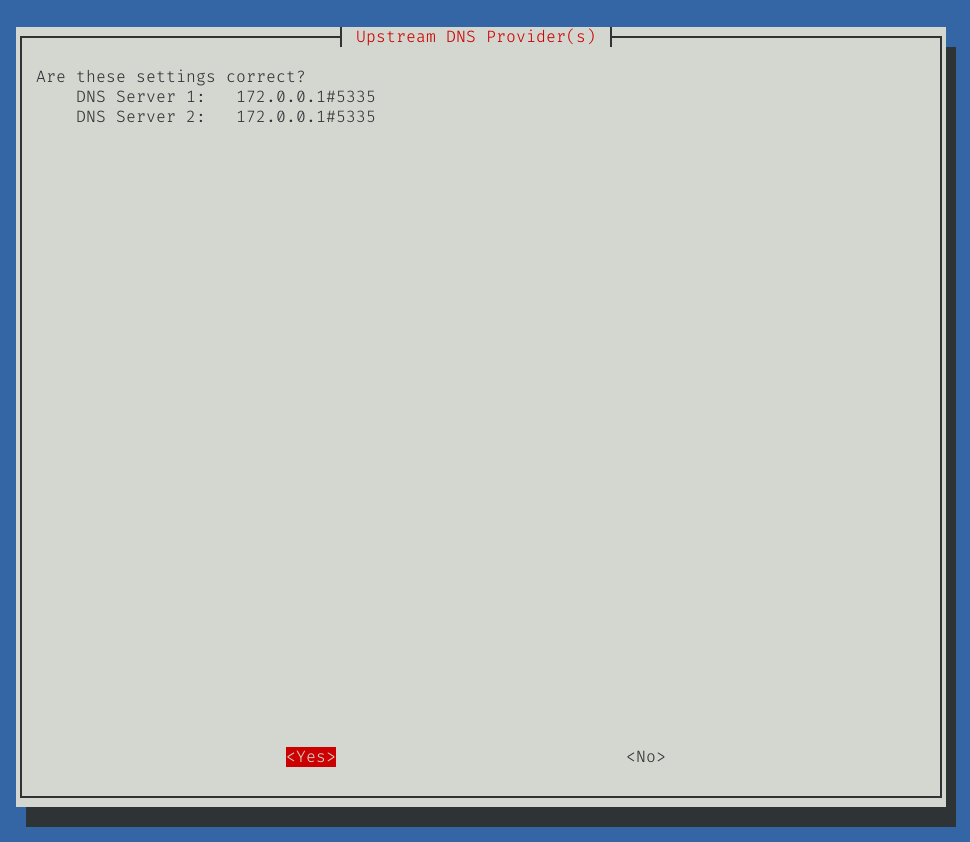
This will bring up a nice, very simple wizard to guide you through the basic installation of Pi-Hole. You should be safe to choose the defaults for everything except the DNS forwarders. We want to point this to our newly tested unbound server, like so:


Also note that on the very last page it’s going to direct you to the web admin panel, which we’ll get to in a second, and give you the password to log in. Make sure to record that in your password manager for later. You can always reset it on the command line via pihole -a -p.
The default webserver for Pi-Hole is lighthttpd, listening on port 80 with no TLS. You obviously do not want that to be available on the internet at large, because your admin password would be transmitted in the clear when you logged in. This would allow anyone who might be sniffing around to log in and look at your entire DNS query history, which is generally not a great idea.
Enabling TLS by adding a certificate to lighthttpd is out of scope of this post and UFW is deliberately preventing access to port 80 on your public interface, so instead we’re going to go with the tried and true method of ssh port forwarding for the last bit of configuration:
# from your CLIENT machine, ssh into your droplet like so:
ssh -L 8080:localhost:80 vpn.hrkrdr.com
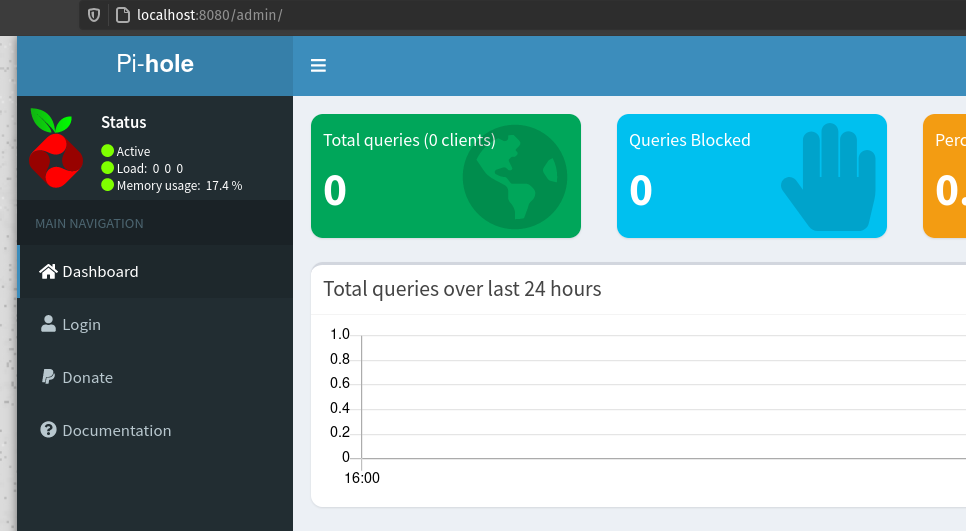
Then pop open a browser and navigate to http://localhost:8080:

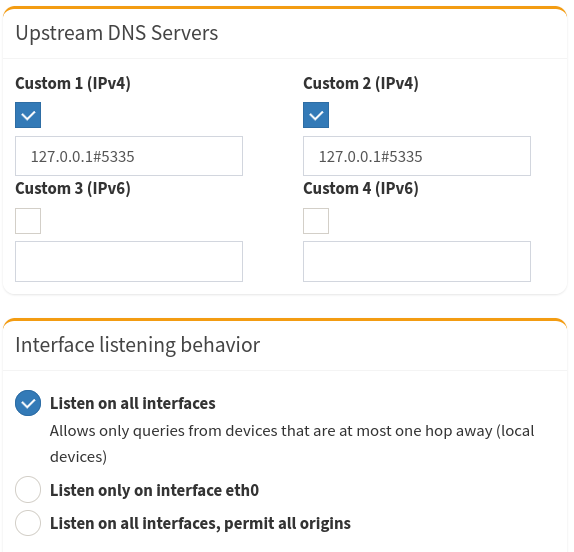
Now you’re connecting securely over SSH, so your requests are encrypted. Click the login button and input the password you received from the installer and navigate to Settings -> DNS. You need to set the service to listen on all interfaces:

Now, for the purposes of this document, Pi-Hole should be configured! You can test by using the dig command, as above:
dig @localhost yahoo.com
<...>

;; ANSWER SECTION:
yahoo.com.		1800	IN	A	98.137.11.163
yahoo.com.		1800	IN	A	74.6.143.25
<...>
WireGuard
Now that we have working resolver services, we can get our VPN service setup. WireGuard is pretty simple on it’s face, but there are some gotchas to look out for.
Server Setup
Before we configure wireguard, we’ll need to enable IP forwarding, so edit /etc/sysctl.conf in your favorite editor and uncomment the following line:
net.ipv4.ip_forward=1
Apply the change with sysctl:
sysctl -p
# You should see the following output
net.ipv4.ip_forward=1
The server setup is very straightforward, we need to generate a private key, and use it to generate a public key. Then we need to define the interface clients will use to connect to the server wg0.
cd /etc/wiregaurd
# set umask to ensure newly created files are restricted
umask 077

# generate key-pair for the server
wg genkey | tee server.key | wg pubkey > server.pub
Now we need to create a configuration file for the wiregaurd interface. At this point you need to decide on a subnet for your wireguard network. It should be an internal RFC1918 network, and not overlap with any other networks you might want to connect to this tunnel. For example, if you’d like to access your homelab network 192.168.10.0/24 over this tunnel, use a completely seperate subnet like 192.168.99.0/24.
If you’ve used the same droplet/distro type as I have, your default gateway interface should be eth0. To check, find out which interface has the default route 0.0.0.0/0:
netstat -ar
Kernel IP routing table
Destination     Gateway         Genmask         Flags   MSS Window  irtt Iface
default         123.123.123.1   0.0.0.0         UG        0 0          0 eth0
Now create and edit /etc/wireguard/wg0.conf config file with your favorite editor and add the following:
[Interface]
Address = 10.172.50.1/24
ListenPort = 51820
# These add forwarding and NAT rules to your firewall when you bring up the interface, and remove them when it's down
PostUp = iptables -A FORWARD -i %i -j ACCEPT; iptables -t nat -A POSTROUTING -o eth0 -j MASQUERADE
PostDown = iptables -D FORWARD -i %i -j ACCEPT; iptables -t nat -D POSTROUTING -o eth0 -j MASQUERADE
Exit your editor and add the Private key for the server into your config:
echo "PrivateKey = $(cat server.key)" >> /etc/wireguard/wg0.conf
Enable the wiregaurd service and start it up:
systemctl enable [email protected]
systemctl daemon-reload
systemctl start wg-quick@wg0
Now the server has a wg0 interface listening on port 51820 for client machines. You can check the status of it with the wg command:
wg
interface: wg0
  public key: XYZ123456ABC=   #Your public key will be different
  private key: (hidden)
  listening port: 58120

# Additionally, it should have the IP address you defined assigned to it:
ip addr show wg0
28: wg0: <POINTOPOINT,NOARP,UP,LOWER_UP> mtu 1420 qdisc noqueue state UNKNOWN group default qlen 1000
    link/none
    inet 10.172.50.1/24 scope global wg0
       valid_lft forever preferred_lft forever
Client config
For the purposes of this article, I’m focusing on mobile clients (iPadOS/iOS/Android) so we’ll be generating and storing client certificates on the server, and then generating a QR Code to configure the client. For your laptop, you’ll want to generate the keys and config locally and copy the public key up to the server.
Let’s create our first mobile client config. I like to create a folder to contain the mobile keys and configs for organization and reference. If you need to recreate your device’s tunnel for whatever reason, it’s as easy as recreating the QR code if you’ve still got the config file handy.
cd /etc/wireguard
mkdir clients
cd clients
umask 077

# set a name variable to make the config generation a bit easier.
name="iPhone"
wg genkey | tee "${name}.key" | wg pubkey > "${name}.pub"
wg genpsk > "${name}.psk"
To generate the config file we’ll use:
echo "[Interface]" > "${name}.conf"
# This is going to be the NEXT available IP address after your server's.
echo "Address = 10.172.50.2/24" >> "${name}.conf"
# The IP of your wg0 interface, which is running pi-hole
echo "DNS = 10.172.50.1" >> "${name}.conf"
echo "PrivateKey = $(cat "${name}.key")" >> "${name}.conf"
Open the config file in your favorite editor and add the Peer block, which is the server definition:
[Peer]
# Allowed IPs here is instructing the client to forward ALL traffic through the tunnel.
AllowedIPs = 0.0.0.0/0, ::/0
Endpoint = vpn.hrkrdr.com:51820
PersistentKeepAlive = 25
Finally, add the server’s public and client’s pre-shared key to the end of the Peer block:
echo "PublicKey = $(cat /etc/wireguard/server.pub)" >> "${name}.conf"
echo "PresharedKey = $(cat "${name}.psk")" >> "${name}.conf"
The final article should look like this:
[Interface]
Address = 10.172.50.2/24
DNS = 10.172.50.1
PrivateKey = XYZ123456ABC=   #Your private key will be different

[Peer]
AllowedIPs = 0.0.0.0/0, ::/0
Endpoint = vpn.hrkrdr.com:51820
PersistentKeepAlive = 25
PresharedKey = XYZ123456ABC=   #Your pre-shared key will be different
PublicKey = XYZ123456ABC=   #Your public key will be different
Finally, we have to edit the server’s config file to enable the Peer:
# Don't edit the wg0.conf when the interface is up! It will revert your changes and obviously not work.
wg-quick down wg0

echo "[Peer]" >> /etc/wireguard/wg0.conf
echo "PublicKey = $(cat "${name}.pub")" >> /etc/wireguard/wg0.conf
echo "PresharedKey = $(cat "${name}.psk")" >> /etc/wireguard/wg0.conf
echo "AllowedIPs = 10.172.50.2/32" >> /etc/wireguard/wg0.conf

wg-quick up wg0
Now if you execute the wg command, it should show you information about your client too:
interface: wg0
  public key: XYZ123456ABC=          #Your server's public key will be different
  private key: (hidden)
  listening port: 51820

peer: F+80gbmHVlOrU+es13S18oMEX2g=    #Your peer's public key will be different
  preshared key: (hidden)
  allowed ips: 10.172.50.2/32
Now we’re going to generate a QR Code to configure the mobile client. Much better than typing out all those long strings of gibberish!
qrencode -t ansiutf8 -r "/etc/wireguard/${name}.conf"
Open up (or install if you haven’t already) the official WireGuard client for your platform and select ‘add a new tunnel’. One of the options will be to use a QR Code for the configuration. Allow the app access to your camera, and point it at the QR code that was generated in your console. At this point you should have a working tunnel! To make sure everything is working correctly, perform a DNS leak test on dnsleaktest.com.
If you want to add more clients, it’s as easy as generating the new config and adding them to the server’s peer list.